Monday 19 June 2023

Gas Tank Skid Plate (aka Hopes and Prayers) Replacement.

Rust Never Sleeps, right? 

In the on-going saga of dealing with rust on a 24 year old Jeep, this project was dealing with a gas tank skid plate that had rust, no, rotted out completely. I have dubbed the skid plate "Hopes and Prayers", mostly because all that was holding my gas tank in the Jeep was hopes and prayers.
If you're reading this, you may be well aware that Jeep TJ gas tanks are all held in place by the very skid plate designed to protect them. Meaning that if the skid plate fails, the  tank falls out. I had noticed a crack in my plate last year, but it was minor and not something I was too concerned about at the time. Fast forward to a couple weeks ago. I was sitting on the lawn waiting for my sons bus to arrive, and I see this under the Jeep. A quick Amazon search and I had a "Amazon Warehouse Deal" (aka - small scratch on it) skid plate and strap kit on my driveway. 

I became a bus rider to work for a few days while waiting for the weekend a some nice weather to tackle the "one hour job". Well, it took six, but you know how these things go. 

To start, up on jack stands the Jeep went - note to self and anyone reading, get taller jack stands. Both rear tires came off, and then the fuel filler cup to free the filler from the body. 


From the drivers side, you should be able to reach in and disconnect the fuel line, vent line, and electrical connections. I was lucky enough that the rust hadn't destroyed the lines, and I was  able to get everything apart relatively easy. For a great tutorial video I highly recommend this video from Taboo Customs on YouTube.


To start you will need to support the skid plate and tank using a jack of some sort. I built a quick jack adapter out of plywood and some two by fours. I had to create a flat surface to carry the weight. It should go without saying don't be like me and do this with a nearly full tank.

The Jeep TJ has seven bolts holding the skid plate on the Jeep. Three in front  over the track bar (rest assured they can be reached with a ratchet and long extension) and four in the back. The confusing part in the back is that there are six bolts. Two of those hold the tank straps in place, they're the longer ones, usually with rubber covers on them. The bolts coming down from the Jeep are carriage bolts, and should be captured by the mounting frame. I had to cut two off ultimately, but they were easily replaced with new hardware from the local hardware store. 

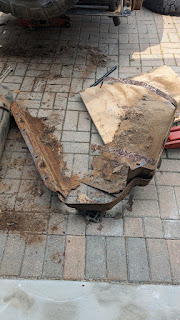
Now onto the "Hopes and Prayers". Once I had the tank sitting on the driveway, and had freed it from the straps (had to cut them off) I discovered just how bad the skid plate was. Basically the tank was being held up off the road by two flaps of rust. A solid bump may have dropped the tank out. 


Given my incredible intelligence (ha) I was stuck with a nearly full tank (about 45L/12gallons, or 73lbs of gas - give or take). I had to lighten that load or there was no way I was going to be able to manhandle it back into place under the Jeep. Fortunately I have a couple spare fuel pumps, and no fear of death (ha), so I "wired" up a pump with one of those lithium ion jumper boxes (you should get one they're handy). I ended up pumping the gas out into whatever spare gas cans I had to make putting the tank back as easy as possible.

Speaking of manhandling. Even empty it was a battle to get the tank and skid back in place. The new skid plate is thicker and has more protection than the stock one, so that added some weight. Not having taller jack stands made working under the Jeep with the tank and jack that much more difficult. I managed and now have a tank in place with a new skid that will last MANY years. If I ever have to drop the tank again, I'm just taking it to a shop.


Sunday 28 May 2023

Six weeks to install an alternator, seems reasonable


Way back in the early days of Spring (or is it late days of Winter?) I started to build a bracket to convert the m38 from a generator to an alternator. All was moving along quiet well with the lower adapter for the alternator, and I was ready to attach the upper bracket. This involved removing one water pump bolt to remove the old bracket, and replace it with the new one. 

And that's when things went south. The bolt broke off flush with the water pump. So now I had to move to remove the water pump. I drained out what was left of the coolant and and went to remove the other three bolts.... and broke another. Two did come out, so there's that. When I tried to get an extractor on the broken bolts, one did come out it was the other one that decided to break again flush with the block. 


Queue ordering reverse drill bits and a new water pump gasket. This lead to removing the grill and radiator from the Jeep. Fortunately, these old military rigs were built to be field serviced, and that only took about 20 minutes.

I centre punched the broken bolt and started with the smallest bit I had, slowly working up to 1/4". Once there, the remains were still firmly embedded in the threads. I managed to use a small punch to pull up an edge. With that done I moved up to regular bits (1/4" reverse was my largest) and managed to get the remains to release. Once that was done I was able to run a tap through. 


During reassembly I took the opportunity to finalize the alternator with the radiator out of the way, and while I did require a spacer to get it set, things went pretty smooth. I do need to add a 90 degree fitting to the bottom of my oil filter housing, and probably need a shorter belt. However, I can now finish off wiring for the charging system and continue on this marathon.


Sunday 12 February 2023

Electrical and Fuel (and I'm still alive)

First off... I'm still alive. It's been a bit, and while I've been working on the Willys, I also have been dealing with life and dealing with said life. It's all good. 

Once I got the Go Devil, er, going, I started work on making it permanent. Since the mechanical fuel pump was a bit of a no go, I made the call to move to an electric pump. I sourced out a low pressure pump and got to work pluming and wiring it in. 

I've also mounted up a proper universal fuse panel in the second battery bay on the cowl, and started into wiring the Jeep to keep it safe and modernized, at least under the hood. From 10' away, it's still going to look like a '52 m38. 


I made a decision early on that the wiring was going to be modern(ish) and ordered in weather pak like connectors. I want to make sure everything can be removed for service, and replacement, as well, should it ever come to it, return to stock. 
With the dash wired, I mounted it (temporarily) for testing, and so I can continue to plug away. 


Right now I have an alternator on order, I'll need to make up some brackets for that. I also have wiring in hand to start wiring the lights. Aside from that, there's a laundry list of things still to do ... brakes, tires, steering, wheel bearings, cooling system, windshield, seats cushions, and so on and so on. I figure if I can get the alternator and cooling buttoned up, plus the parking brake at least, I should be able to "drive" it up and down my driveway to make working on it, and in the garage, a little easier. 


Saturday 6 August 2022

The Go Devil Goes!


 Despite just being a week, the Go Devil that wouldn't go is now going. 

In a testament to the Jeep community, I put out my troubles to my group of Jeep buddies and had a bunch of excellent suggestions. The key being that timing appeared to be off, and most likely it would be 180. 

Forgive the quality - Taken from a video
To check, cylinder 1 has to be brought to TDC, Top Dead Centre. This is when the piston has reached the top of it's stroke, both valves are closed, and the air/fuel mix is compressed and ready for the spark. Then you rotate the engine so that it's 5 degrees before TDC, and where the rotor in the distributor sits, is here the number one spark plug wire should be connected. 


On a Go Devil, this puts the rotor in approximately the 5 o'clock point. If timing was 180 degrees out, it would point at 11. Since I couldn't find the timing marks on my engine, I had to rely on trusting the previous owners to have not mucked with it. 

I pulled the plugs and got out my trusting TDC tool, my thumb. By placing my thumb over the spark plug opening by turning the engine over I was able to get a feel for the four strokes, with the "burp" past my thumb being compression. At the same time, I had the distributor open, and was watching the rotor. What i discovered is that the engine wasn't 180 degrees out, but it wasn't firing spark plug 1 at 5 o'clock, it was more like 7. I attribute that to the non-stock distributor on the engine. 

In any case, once I moved the plug wires to their new location on the distributor cap, and double checked EVERY electrical connection, I was ready to try again. I fed some starter fluid through and it started. It surprised me, and elicited a very large laugh from me. I got out my gas squirt bottle, and went at it, and well, this video says it all. It started, and it's safe to say, the Go Devil engine is going. 


Tuesday 2 August 2022

Just can't get it running

 Despite my best efforts, the little Go Devil engine, just doesn't want to, er, go. 

Since the last instalment (Here) I've been busy trying to get the engine do more than "pop". I've been trying to actually get it to run. Ultimately, I discovered that the rebuild I did on the carb just wasn't up to snuff. It was leaking out of places that it had no right to leak out of, and ultimately it was literally pouring fuel into the intake manifold, flooding out the engine. 

During this period, I also did a compression test to see if the engine was behaving, it turned out 80, 75, 60, 80 front to back, and on a cold engine. Not terrible, #3 was a little lower than I'd like, but we'll see what happens once it can warm up.


Since the carb ended up being a bust, I ended up ordering a Solex carburetor off Amazon. From what I've read, Mahindra makes these for Omix-Ada, and Mahindra has been playing the Jeep game for a while now. It's an interesting carb, in that it doesn't have a choke butterfly, it instead relies on a bypass valve of sorts that add extra fuel. Rather than choking the air, it adds more fuel. Interesting, and a mixed bag on reviews. For what it's worth, it's no longer flooding the engine, and it doesn't leak like the old YS Carb. 

I got it installed and setup, it was practically a bolt on swap. I had to make a new fuel line adapter, but it was a minor inconvenience, and from what I understand, a result of having an m38 rather than a CJ3A.


So, did it work? Short answer, no, long answer, no. The engine still won't run. I went back to the drawing board. I double checked the points, electrical, spark plug gaps, well, everything related to a running engine. I then pinged some people smarter than I am, and the consensus seems to be my timing may be off. If you have any thoughts, feel free to drop them in the comments section. 


At this point, stay tuned. I need to go dig out Grampa's timing gun, and pray that the distributor will come lose. I will get this thing running!


In other news, after staring at my two broken fuel pumps for a month, I had a thought - Could I take the good parts from them and make one working one?  Turns out that's a yes. The broken casting on the "new" one practically crumbled in my hand during disassembly, but I managed to salvage the arm, diaphragm, and spring. I transplanted those into the old pump's lower assembly, and while I could've used the old pump's upper, the internal valves were shot. I decided to mate it to the newer upper. I think it's quite usable, and the pump works well. It's not installed on the engine yet, I don't need it during my attempts to start the Jeep, but it's ready. 


Tuesday 28 June 2022

Progress is progress.

 With the weather being nicer, and having a bit more free time as my son is able to entertain himself longer, time spent on the m38 is increasing. As more time is spent working on it, ambition and excitement continues to build, pushing me to spend more time working on it. 

I started off with finally picking up a battery. That in of itself was an easy enough task, well, as easy as a trip to Costco on a Saturday morning can be. 

All was going well in the garage after getting the battery hooked up. I got the oil filter housing back on, checked the torque on the oil pan bolts, and then went to bolt on the brand new fuel pump. While tightening the two bolts for the pump the flange broke off. I was barely above hand tight, so a part of me believes the casting was flawed. I put a blank cover plate on and decided to just use a gravity feed bottle to get some fuel into the carburetor. 


I managed to get the engine to pop a couple times, and it was about that time that I realized that I had not yet hooked up the oil pressure gauge. So the positive is that the engine makes oil pressure, the negative, is I squirted some oil out the side of the engine. I have an oil pressure test kit that I need to hook up before trying that again. 

Taking a break from the engine (I had actually forgotten that I owned the oil pressure test kit) I decided to start into the dash itself. I finished running the hand throttle and choke controls. Found the nut that holds the steering wheel on, and mounted all the gauges in the dash panel. That was pretty uneventful, but did require a trip to Princess Auto for some terminal connectors. Not that I need much excuse to zip on down to Princess Auto. 


Oil pressure lines for the dash are on order now, and with more open weekends ahead, I should be able to continue plucking off these small tasks, because any progress is still progress.


Soon... soon

Monday 13 June 2022

Jeep m38 proving that things don't always go as planned.

If you've been around a while, you may have read my last update from April. (Right here

I outlined how I discovered antifreeze in my oil and decided a new head gasket was in order. A job that should take a couple hours at best on a flat head turned into a multi-week ordeal. Not being my full time job, meant I had to tackle this as time permitted, and like more things on Jeeps, it kinda snowballed. 

I wound up purchasing a stud remover, and asking the stuck stud to come out nicely with it. Which it did, so that's a win, and I did get the head removed. Much to my surprise, the pistons looks great, the block had no surprises, and everything was generally in order. Well, except when I drained the oil. 

The drain opened and started with green, followed by milkshake brown, then some actual oil, and then sludge. Lots of sludge. As much as I didn't want to, the oil pan was coming off. In it, I found a 1/4" of goo. It took a bit of time and some brake cleaner to get it to come out. Followed by cleaning up the pan and getting it spotless. 

I had to order in some more gaskets (note to future shade tree engine rebuilders, order the full gasket set at the start). 

Ultimately, the oil pan went back on, the valve cover got a new gasket, and the head went back on with it new copper coated Fel-Pro gasket. 

I have a set of new spark plugs, and we're just about down with that easy head gasket replacement. Next I need some high-zinc oil, some engine flush, and that should be it. Hopefully. 

The tunnel is a long one, but I can see some light twinkling at the end. 


As a small bonus for making it this far, here's the open engine turning over in all it's four cylinder glory. Something about being able to see everything running with the head off. Must be a flat head thing.